Manage SDS Library is where you maintain the Safety Data Sheets (SDSs) on each of your locations. This manual covers:
- Open a location and find SDSs
- Add SDSs to the location
- The buttons on each SDS
- The ⋮ menu on each SDS
- The menu of the location
- Move between locations
- Work on SDSs from all locations at once
What you see depends on your role and your plan, so some buttons and menu items may be missing for you.
1. Open a location and find SDSs
Click Manage SDS Library in the left menu. When the menu is collapsed, its short name under the icon is SDS Admin. SDS Manager opens your default location. The line at the top shows where you are, for example SDS Library for Acme Manufacturing Inc. › Main Plant › Laboratory. Click a name in that line to go up a level.
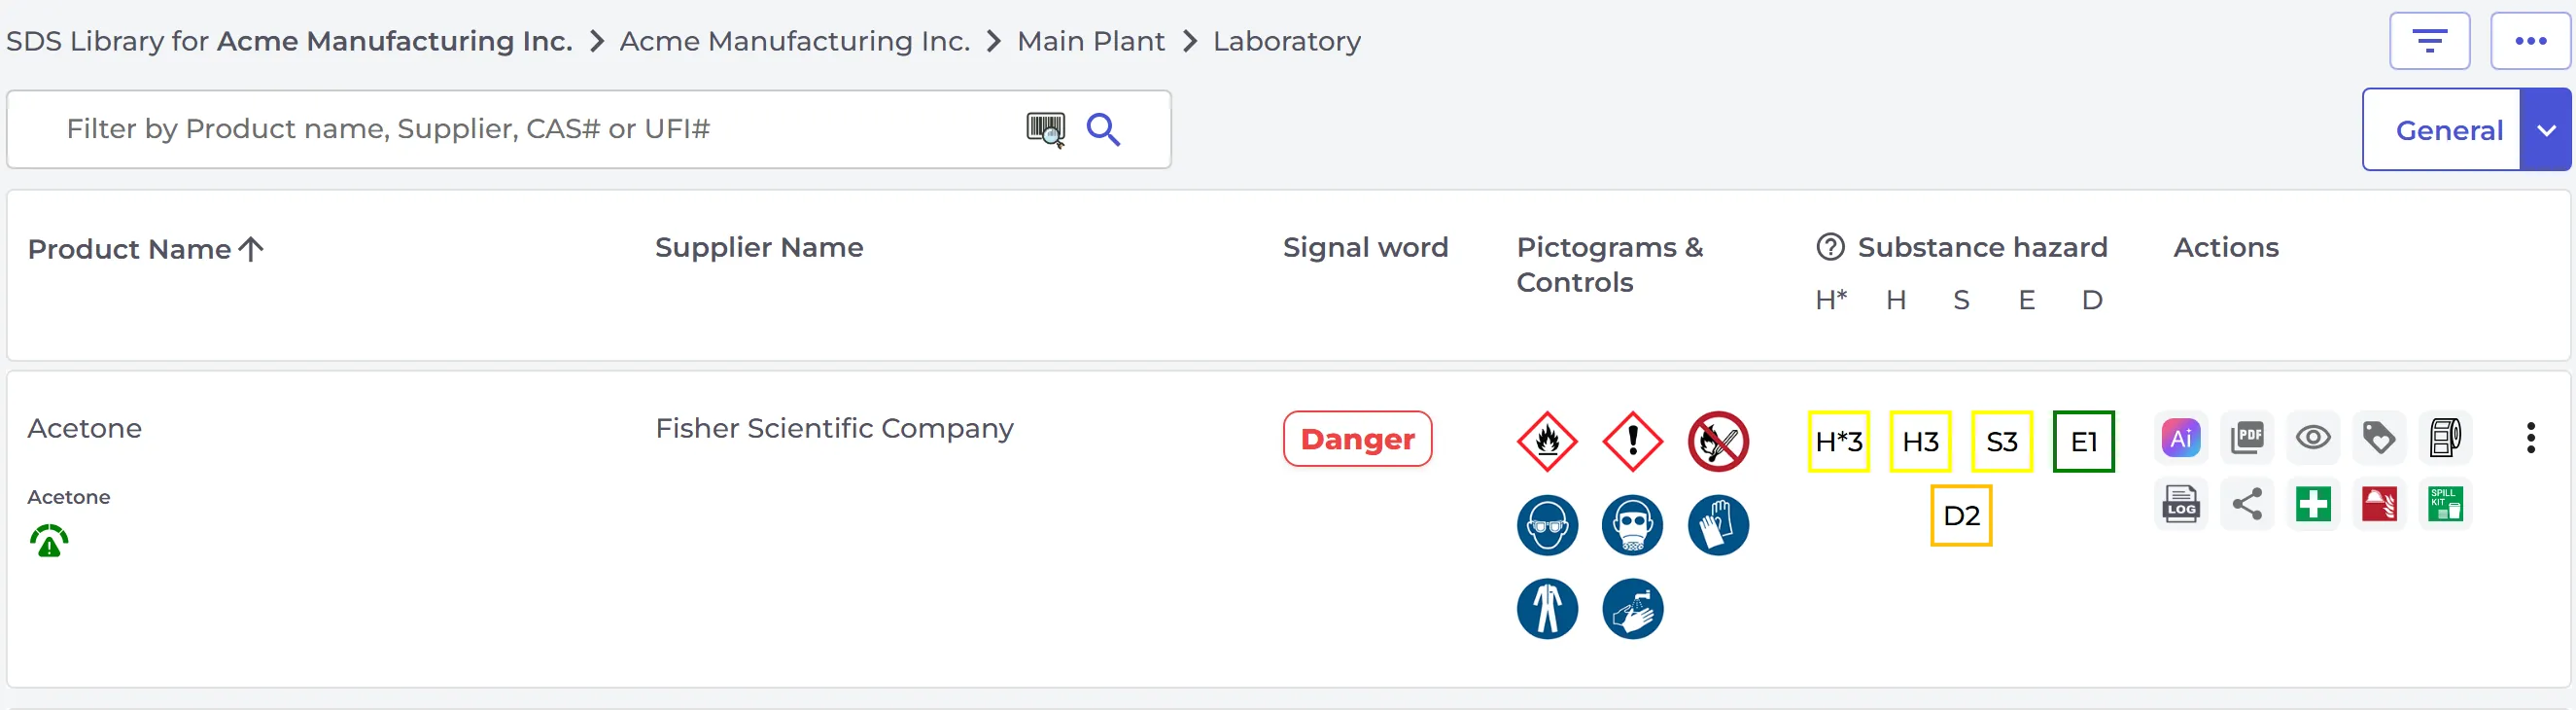
- Type part of the product name, supplier name, CAS# or UFI# in the search field. The barcode icon in the field lets you scan the barcode on a product.
- If the location has sub-locations, switch on Include sub-locations to see their SDSs too.
- Choose a view: General, Hazard, Revision, Risk or Personalized view. On a small screen the views are in a drop-down list. In Personalized view you choose your own columns with the ⊕ button Add more columns.
- Click a column header to sort the list. Under Substance hazard you can sort by the health (H), safety (S) and environment (E) ratings. H* is the health rating without the hazards of swallowing, and D is the disposal rating. A higher number means a higher hazard.
- The filter button at the top right lets you filter the list.
2. Add SDSs to the location
Click Add Safety Data Sheet below the list. You can search our global database of 30 million+ SDSs, scan a barcode, take pictures of a label, or upload an SDS PDF file. Users who may not add SDSs see Request Safety Data Sheet to be added to company library instead.
Read more: How to add Safety Data Sheets to your SDS library
3. The buttons on each SDS
- Ask AI assistant (Ai): ask a question about the product. Only in English.
- View PDF: open the SDS PDF file.
- View details (eye): all the information from the SDS, easy to read on any screen.
- Print Label: print a secondary container label. Read more: How to create Secondary container labels for hazardous chemicals
- Add to print Avery/Brady label: collect SDSs and print their labels on Avery or Brady label sheets. Read more: How to Create an Avery/Brady Label for an SDS PDF?
- Track Usage: record the amount of the product on the location. Read more: How can I edit the amount of a product on a location?
- Share PDF: share the SDS PDF file with someone.
- First aid, Firefighting and Accidental release: open that section of the SDS straight away.
- A paper clip shows that files are attached to the SDS.
4. The ⋮ menu on each SDS
Click ⋮ at the end of the row.
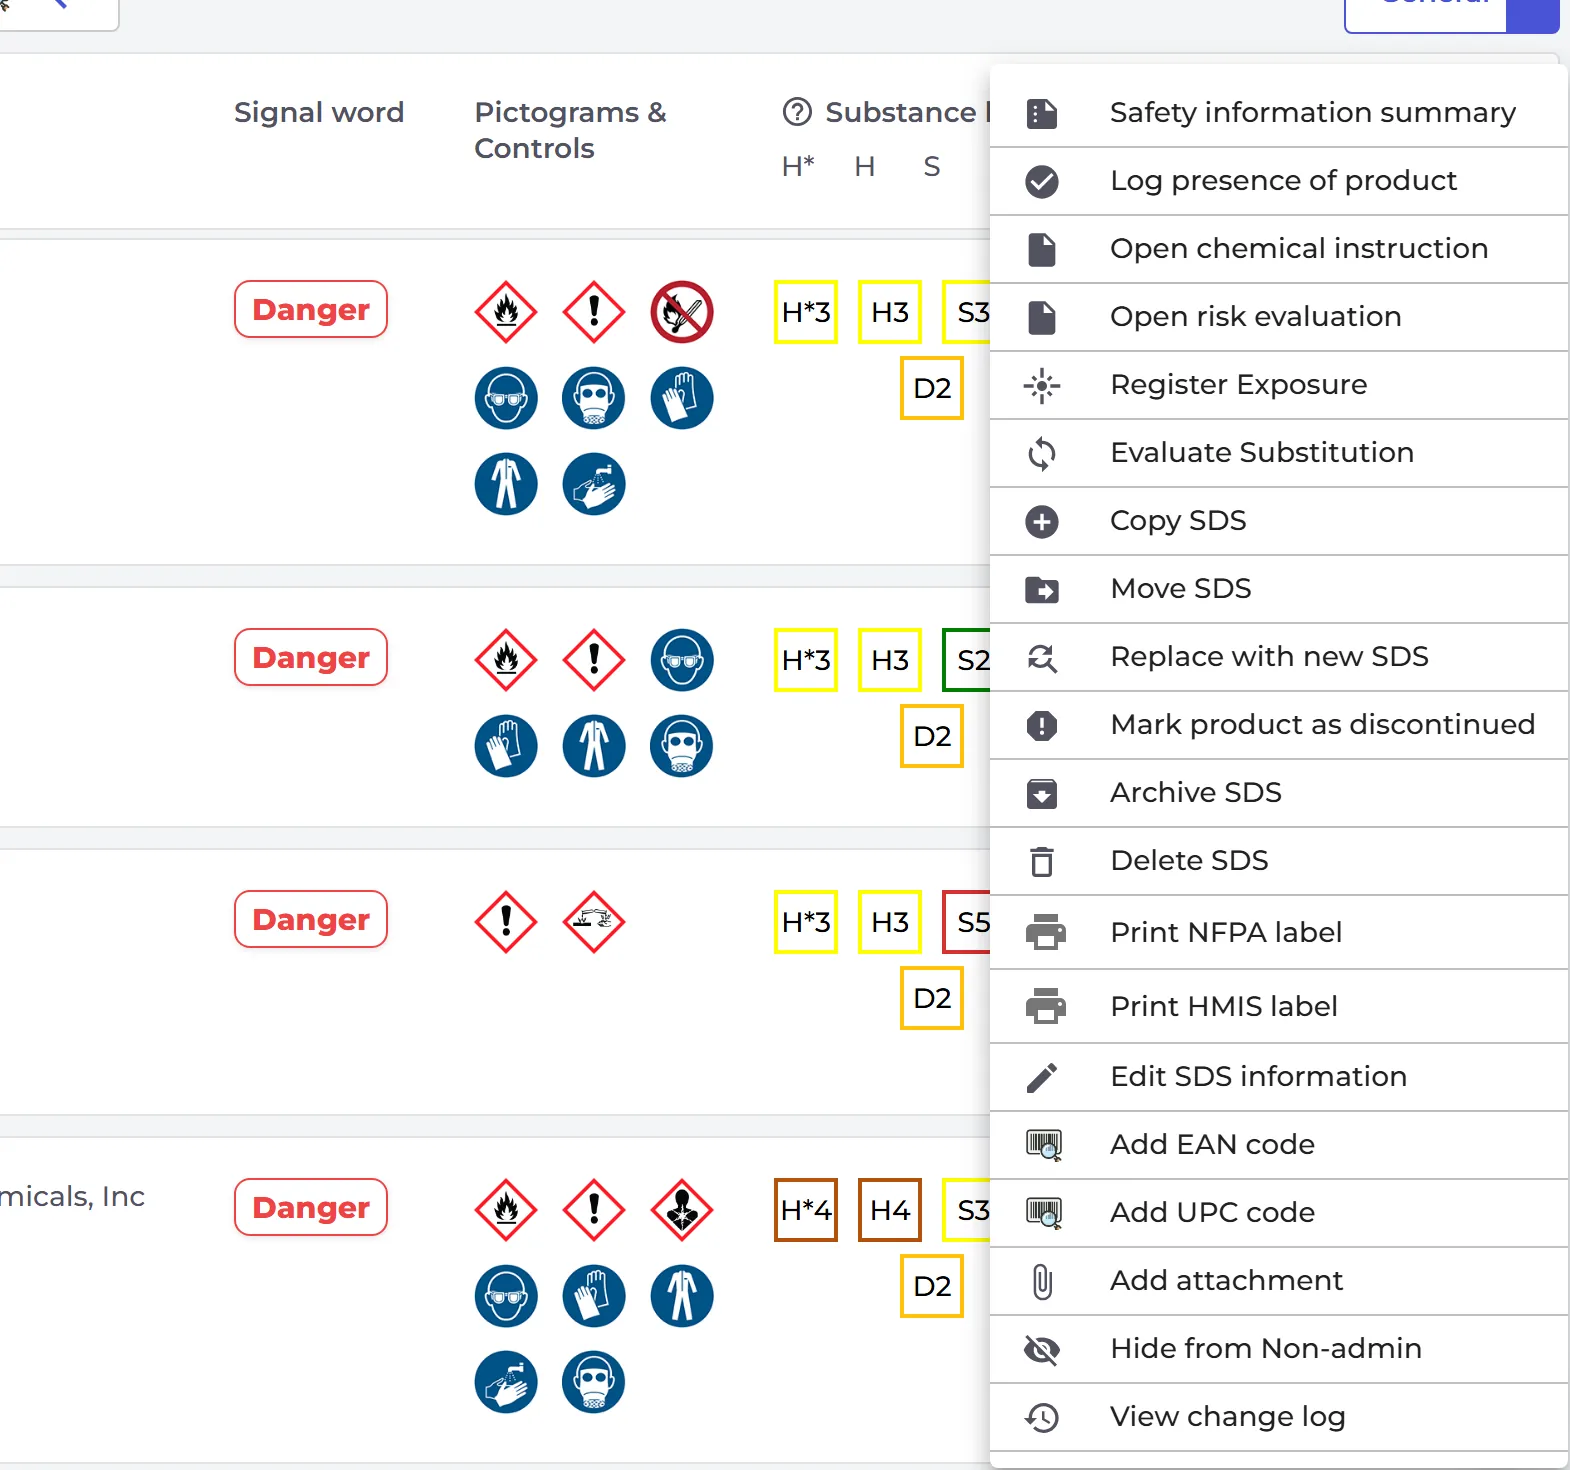
- Safety information summary: a short summary of the safety information in the SDS.
- Log presence of product: confirm that the product is still on the location, when you check your inventory.
- Create risk evaluation or Open risk evaluation: read more in How to create a risk assessment of a chemical?
- Open chemical instruction: shown when the SDS has an approved risk evaluation. Read more: Access Chemical instructions by scanning QR codes
- Open chemical job instruction: shown when the SDS is part of the risk evaluation of a job procedure. Read more: How can I use SDS Manager to document job/work procedures?
- Register Exposure: record that someone was exposed to the product.
- Evaluate Substitution: record whether the product can be replaced by a less hazardous one.
- Copy SDS and Move SDS: add the SDS to another location, or move it there. Read more: How can I move or copy SDSs from one location to another?
- Replace with new SDS: replace the SDS with another SDS, for example a new file from your supplier. Read more: My supplier sent me a new updated Safety Data Sheet
- Mark product as discontinued: tell us that the product is no longer sold.
- Archive SDS: move the SDS to the archive when you no longer use the product. Read more: What do I do with SDS for chemicals that we no longer use (Archive SDS)?
- Delete SDS: an SDS must be archived before you can delete it from the archive.
- Print NFPA label and Print HMIS label (USA and Canada): read more in Print NFPA label for chemical and Print HMIS (WHMIS) label for chemical.
- Edit SDS information: correct information that was read from the SDS, or add the name you use for the product. Read more: How can I edit information that is extracted from an SDS?
- Add EAN code and Add UPC code: link the product barcode to the SDS, so that employees can find it by scanning the barcode. Read more: How to lookup an SDS by scanning Barcode
- Add attachment: attach a file to the SDS, for example a product sheet or a work instruction. Read more: How can I attach a document to an SDS in the library?
- Hide from Non-admin: hide a sensitive SDS from users who are not admins. Read more: How can I hide SDSs with sensitive chemicals from other users?
- Move amount to other location: shown when you have entered an amount for the product.
- View change log: see who added or changed the SDS, and when. Read more: How can I know who added or updated an SDS in our SDS library?
5. The menu of the location
Click More options (⋯) at the top right of the page.
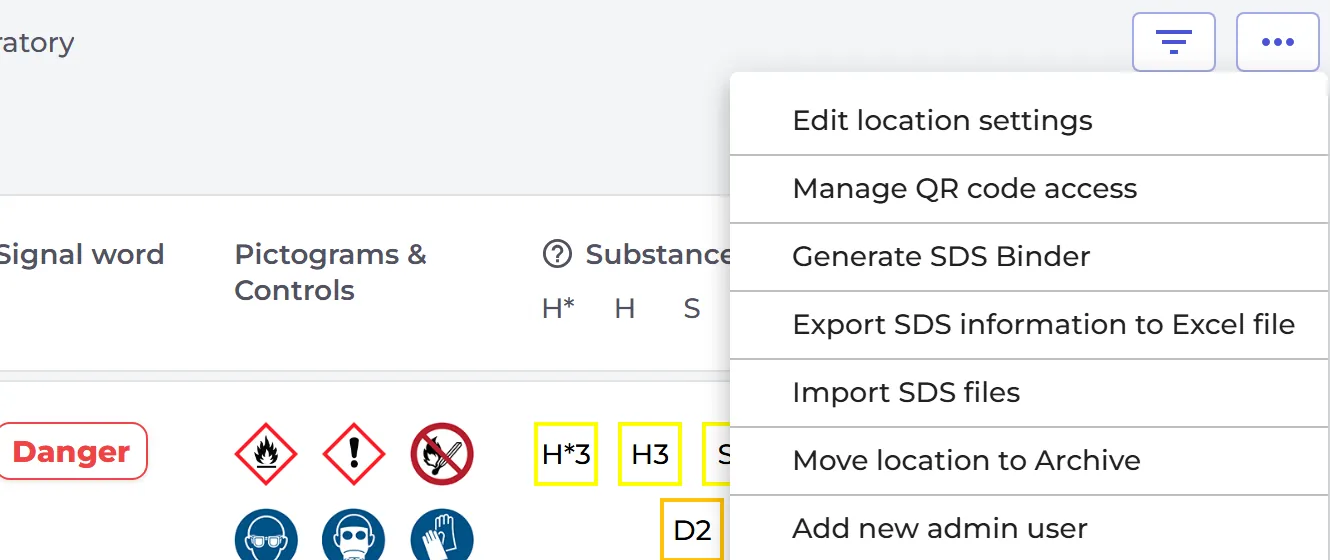
- Edit location settings: change the name or the parent location, choose the person responsible for the location, and get an email when SDSs on the location change.
- Manage QR code access: make a QR code poster for this location. Read more: How can our employees access our SDS library by scanning QR code poster?
- Generate SDS Binder: one PDF file with all SDSs on the location, for offline access or your archive. Read more: How to create an SDS-Binder file?
- Export SDS information to Excel file: the columns you show in Personalized view are included. Read more: How can I export our SDS library to a Excel/xlsx/csv file?
- Import SDS files: import SDS PDF files or a ZIP file to this location. Read more: How do I import our current file-based SDS library?
- Move location to Archive: read more in Where can I see archived locations?
- Add new admin user: let someone else manage this location. Read more: How can I restrict users to only have access to SDS for certain locations?
6. Move between locations
In the left menu, your locations are listed under Manage SDS Library. The number after a name is the number of SDSs on that location. Hold the mouse over a location to see its buttons:
- The heart adds the location to My Location List. Your favorite locations are then shown first, under Favorite locations.
- In Favorite locations, the star sets the location as your default. Your default location opens when you click Manage SDS Library, and its star is yellow.
- + adds a sub-location under the location.
Add location at the bottom of the list adds a new top-level location. For an overview of all locations, click Locations in the left menu. Read more: How can I create a hierarchy of locations that match our company structure?
7. Work on SDSs from all locations at once
Manage SDS Library shows one location, with its sub-locations if you switch them on. To see and change SDSs from all your locations, click Filter (SDS Filter) in the left menu. Tick the SDSs you want, then use Bulk Action to move or copy them to another location, archive them, compare two SDSs, or set a custom field. Export to XLSX exports the list.